Find us on:
POPCS Tech Help
  • Home
  • Grade 5
  • Middle School
  • Upper School

Free Up Space - The Easiest Photo/Video Backup Tool Yet

8/24/2016

0 Comments

 
Managing the space on my iPad and phone has always been a hassle. Until this point, I've noticed that many sites and services offer photo/video backup, but they have a catch. In addition to backing up my photos, they also keep a copy on my device!  While it's nice that my photos/videos are up in "the cloud," I really want them off my device too. Give me some space!

That said, let's talk about the ultimate photo/video backup and clear space off my iPad solution - Google Photos. Before I jump into how to make your lives easier, I have to make a disclaimer. Although not much has been said about this, Google will probably use information from your photos/videos to target you with ads. In my case, I'm willing to trade that for the free, unlimited backup of all my photos and videos.  In your case, you'll have to make a decision. It's up to you! Here's an article that goes into more detail about the dark side of Google's free services.  


Step 1 - Download the Google Photos App. It's a colorful pinwheel

Picture

Step 2 - Sign in with your Google account info.

If you want to keep all of your families photos in ONE place, just choose one Google account to sync all your photos/videos to. In my family's case, I grabbed my wife's phone and signed into her Google Photos with my Google account info.  Now all of her photos/videos AND my photos/videos are going to the same place into my Google account.

Step 3 - Follow the steps to get set up. Choose the High Quality (free unlimited storage) option. High quality = 16 megapixels. It really IS high quality.  

Picture

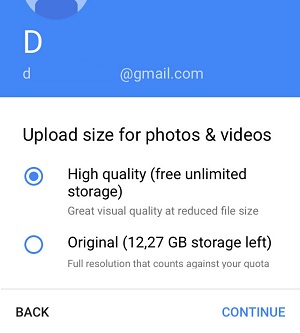
Step 4 - Let it Work for a while...maybe a day.

Depending on how many photos you have on your device, this could take a while. Give it as much time as it needs. Keep the app open and in good wifi to upload the first massive batch of photos and videos. Tap on Assistant at the bottom of the app to see the progress of your backup.

Step 5 - Free Up Storage!

1 - Tap the 3 lines on the top left
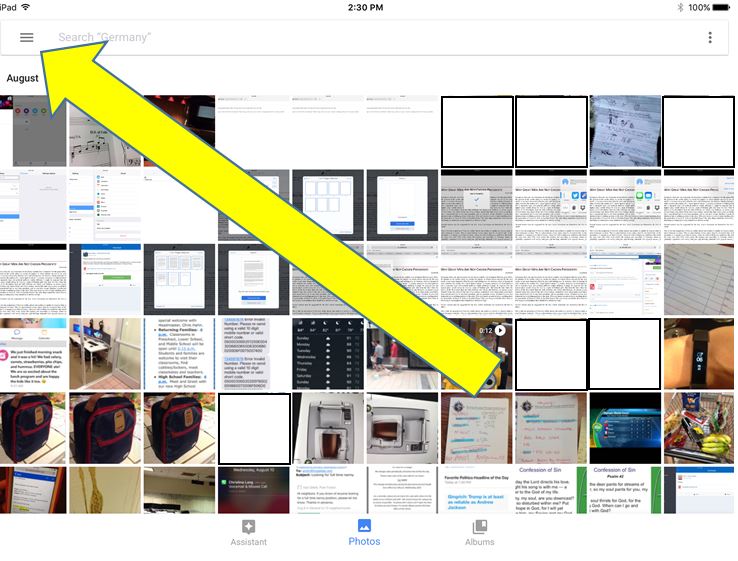
Picture
Click image to expand
2 - Tap "Free up space" and follow the prompts
Picture
Click image to expand

Note: If you notice that your photo/video backup stops a couple weeks later, make sure to open the app so it restarts again. Even though I had turned on Background App Refresh (so that it works in the background even when it's closed), I found that it wouldn't automatically backup unless the app was open sometimes.  Tap on Assistant on the bottom of the app to see how many photos/videos are in queue to back up. 

0 Comments

Wi-Fi Calling

3/31/2016

0 Comments

 
Parts of the lower school and middle school building have gotten much worse during construction for cell phone connections. I don’t think it will change unless a more powerful signal is put in our area. 

One feature that can alleviate this problem is “Wi-Fi Calling.” Some phones have the capability to use your Wi-Fi connection to help get your cell phone to connect for calls and text messages. 

This article explains more about the concept and gives links to instructions for different cell service providers and compatible phone information. Thanks to @bradleychambers on Twitter for the information!
http://boundless.aerohive.com/experts/How-To-Use-Wi-Fi-To-Elimate-Cellular-Dead-Spots.html

If you have tried this feature in the past and it did not work, you may want to try again. The IT Director recently made some firewall changes necessary to support it. 

An iPhone 6 Plus on AT&T has been tested and connected successfully to the service. Tests on other carriers or models have not been done. 

Let the IT Director know if you have a Samsung phone and you are connecting it. He would like to see the settings for that. 

​P.S. When connected on an iPhone  you will see the “Wi-Fi” letters in the upper left hand corner of your device. 

Picture
0 Comments

Turning Off the "Clutter" Option in Office 365

3/17/2016

0 Comments

 
Office 365 has a new feature called "Clutter" which tries to filter out low-priority email from your Inbox to save you time. "Low-priority" email can be newsletters and other promotions that you don't often read. Unfortunately, I have heard from a number of  users that are seeing important email going into their Clutter folder. 

​To see if you have anything in Clutter, look on the left hand column of Outlook for the Clutter folder. It should fall right under "Deleted Items."
Picture
Check to see if you have any email in your Clutter folder. If it does not appear, then Clutter is not turned on for your email and  you don't have to do anything further.

TURNING CLUTTER OFF
If you would rather NOT have Clutter filtering your email, then you need to turn it off. 

In order to turn Clutter off, you will need to access your web mail at www.popcsmail.org. Log in to this website with your POPCS email address and email password. Contact help@popcs.org if you do not know your email password.

Once logged in, choose the "MAIL" option under your list of Office Online features. 
Picture
Once you are in your mailbox, look for the settings icon. It is a small gear shaped icon in the upper right hand corner of the windows. Click on the gear and choose OPTIONS from the list. 
Picture
Once you click on OPTIONS, you will see a long list of options available to you. Under the MAIL section and under the AUTOMATIC PROCESSING section, you will find CLUTTER. Click on this option and you will see the settings.

To TURN CLUTTER OFF, UNCHECK the 2 boxes that are shown below. Click on SAVE when you are finished.
​
Picture
With Clutter turned off, you will no longer have any emails go to that folder in Outlook. However, you will still need to access the folder to see any email messages that you received before you made this change.

​Questions? Contact help@popcs.org
0 Comments

Word Attachments Open in "Reading Mode"

9/11/2015

0 Comments

 
If you receive a Microsoft Word document as an attachment, you may have noticed that it opens in the funky "Reading Mode" by default. Many users prefer to see it in the regular "Print Layout".

One quick way to change it is to click on the "Print Layout" button in the bottom right toolbar, next to the zoom slider. 

If you would like to change the default so that a Word attachment always opens in "Print Layout" then follow these steps:

  • In Word, click on  the FILE menu and then choose OPTIONS. 
  • You will already be in the GENERAL section of the options.
  • At the bottom of the window, look for "Open e-mail attachments and other uneditable files in reading view."
  • Un-check that box next to this item and click on OK.
Picture
0 Comments

Wow! That Sure is Bright!

6/3/2015

0 Comments

 
Many new users of Outlook 2013 often report that it is quite BRIGHT. That is because the left hand column and the top of Outlook used to be a gray color instead of white. Now EVERYTHING is white. All the icons and lines are also in blue instead a variety of gold, orange, blue, and red. 

Well, you do get used to it. After a couple weeks you will look back at Outlook 2010 and think it looks rather old-fashioned. Really! But if you truly want to tone it down a bit, there are some tweaks you can do. 

The number one thing is to change the theme to a light gray or a dark gray. Click on the FILE menu, and choose "Office Account". You will have the option to change the THEME to light gray or dark gray. 

Other display tweaks can be found at:
http://www.howto-outlook.com/howto/outlook2013whiteandbright.htm
Picture
0 Comments

Setting up Outlook 2013 after the Upgrade

6/3/2015

1 Comment

 
This post is designed to assist Prince of Peace Christian School staff who have an existing computer in their classroom or office with Outlook already running under their email account. All campus computers are being upgraded to Office 2013 / Outlook 2013 this summer. Once the upgrade is complete, you will have to do a few steps to make Outlook work for you again. That is what is described below. 

#1 sign that your computer has been upgraded? Your shortcut to Outlook has gone missing or (in the case of the taskbar) it no longer works. 

When are ready to configure Outlook 2013, first ask yourself this question: "Do I know my email password?" If you are not sure, log on to www.popcsmail.org with your email address and test it out. If you need a password reset, contact support at help@popcs.org. 

Your next step is to find the new Outlook 2013 program shortcut. Click on the Start button, then click on "All Programs."
Picture
Scroll down till you see a folder named "Microsoft Office 2013." Click once on the folder name and then click once on "Outlook 2013."
Picture
Now have a little patience as Outlook 2013 launches for the first time. It will take it a few moments to get started. You will eventually see a bright blue box with the word "Outlook" in the middle. You will see information in the bottom left corner that will give you an idea of what is happening with the setup. 
Picture
Eventually, you will be prompted for your email password. The email address will already be listed for you (unless you haven't ever used Outlook on this computer before.) Type in your email password and be sure to CHECK THE BOX that says "Remember my credentials." Otherwise, you will keep seeing that box.  
Picture
You will see the blue box again for a little bit, but soon the full Outlook program will appear. WAIT! We aren't finished yet! At first, the Inbox will not be filled with your email. Outlook will now re-download your email and set up the configuration. This will take a little bit of time, though you can start typing a new message or looking at email that is already there. To find out what is happening, look at the bottom right hand corner of Outlook for updates. It will tell you what folder it is currently working on and how much more data it has to download. 
Picture
During the is time, you will get an ERROR message telling you to restart Outlook. You can do that at any time without harming anything. 
Picture
One final tip before you finish is to set up a new shortcut. The easiest way, while Outlook is open, is to right-click on the Outlook icon in the taskbar and choose "Pin this program to taskbar." This will keep the icon on your taskbar even when Outlook is not running. You may want to do this with Word, Excel, or PowerPoint also. Remember to go back to the start button to launch those programs first.  
Picture
Another way to create a shortcut is to go back to the Start button and to the Outlook icon in the All Programs section. Right-click on it there an choose "Send To" and then choose "Desktop - create shortcut." That will put a shortcut on your desktop. 

Questions? Email help@popcs.org or call the front desk and have them contact your favorite IT guy. 
1 Comment

Installing Office 2013 Using  Your Prince of Peace Account

5/21/2015

1 Comment

 
POPCS Staff:
Included with your POPCS email account is the rights to install Microsoft Office 2013 on up to five personal computers. You may continue to use this install for as long as you are employed by Prince of Peace Christian School. Follow the information below to install Microsoft Office 2013. To complete this task, you will want to be on the computer you will be installing Microsoft Office on. Also, you will need to know your POPCS email address and email password.

Click on this link to start the process of verifying your email address. Type in your email address in the box and click on "Sign up."

You should be told "You already have an account." Click "Continue."
Picture
It will take you to your email sign on page (similar to www.popcsmail.org). At this point you will sign in with your POPCS email address and password. It will give you a message that you are "Almost There" and you will click on the "Start" button.

You will now go into your email account. Look in the upper right hand corner of the screen for the gear icon and click on it.
Picture
When you click on the gear, it will give you a number of options. Click on "Office 365 Settings." Under settings, you will click on "SOFTWARE: Install and manage software." You will then see the Office install page. Click on "Install."
Picture
You will download a small file that is used to start the installation. Once you download the file, find it in your downloads folder and double-click on it to start the installation. Follow the instructions on the screen. It will take some time to download the full installation package as part of this process. But the screen will update you on what is happening. It will even let you start using Microsoft Office before the full installation is finished!
Picture
If you have any trouble during installation, please email help@popcs.org for assistance.
1 Comment

Guided Access Feature in iOS 8

3/6/2015

0 Comments

 
A link to a great tutorial on setting up the Guided Access feature on a student iPad including the time limit function:
http://youtu.be/9x9NeSbEKOE

As noted by @cjdelbalso , there is also an option for disabling a specific area of the screen: 
"One feature that is not shown in the video is the function to disable specific areas on the screen. When you are in the main guided access menu, simply use your finger to draw a box or circle around the area you want to disable. This feature is very helpful if your kids are using an app that has ads or buttons you don’t want them to click on."

This feature is highly recommended for younger students whenever they use your class iPads. 
0 Comments

Information Meeting Notes

3/1/2015

0 Comments

 
Picture
Prince of Peace Christian School is hosting an information meeting for 4th grade parents to review the ratonale and specifics of the 1:1 technology program for students in 5th-12th grade. The 1:1 program will be new in 5th grade during the 2015-2016 school year and this meeting will help parents get all the information about the program.

The meeting will be  held on Monday, March 2, at 8:30 AM in the Fine Arts Center Choir room and also at 7:00 PM in Mrs. Peterson's 4th grade classroom #1004. 

The agenda/notes for the meeting are available on this web site for reference:
http://www.popcshelp.org/5th-grade-ipad-information-meeting.html


If you have questions about the program, please email help @ popcs.org.


0 Comments

New Outlook App for iOS and Android

1/30/2015

0 Comments

 
Picture
Microsoft released an Outlook app for iOS and Android devices this week. It looks like an excellent option for accessing your POPCS email. 

Watch an overview of the new app on this one minute video:
https://www.youtube.com/watch?v=9cBfywn_CnU#t=51

This app has a number of features that may make it preferable to you over the built in email app in iOS. You will get your Outlook calendar built in to the same app. You can also attach files from DropBox, Google Drive, or OneDrive when sending attachments.  The Inbox contains a “Focused Inbox” feature that “intelligently presorts your email so you can focus on what matters.” In other words, it puts less personal mail in an “Other” section so you can see personal items more quickly.

This Outlook app can also be used to manage your Gmail or Yahoo email as well. You can add multiple accounts to one device. 

This link (if opened on your iPad or iPhone) will take you to the install page in the Apple App Store:
https://itunes.apple.com/app/id951937596

0 Comments
<<Previous

    Categories

    All
    Backup
    Email
    IOS
    Office
    Parents
    Staff
    Students

    Archives

    August 2016
    March 2016
    September 2015
    June 2015
    May 2015
    March 2015
    January 2015
    December 2014

    RSS Feed


    Tweets by @POPCShelp
Proudly powered by Weebly